
Bowden Spacelander- 3D Model
The project addressed obstacles like generating complex components like handles, cut-outs, and fastening mechanisms and establishing seamless transitions by making full use of SolidWorks features including boundary surfaces, lofts, and 3D sketches.


01
First concept sketches
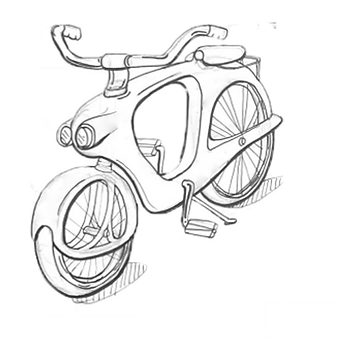
To kickstart the project, we made three proposals of possible products to model. I focused on looking for very organic shapes, ideally it would have been a daily product, so even if it was a common object, there’s still some complexity and beauty to it. I proposed a game controller, LA Natura coffee machine and the 1960 Bowden spacelander bicycle.
02
Body approach
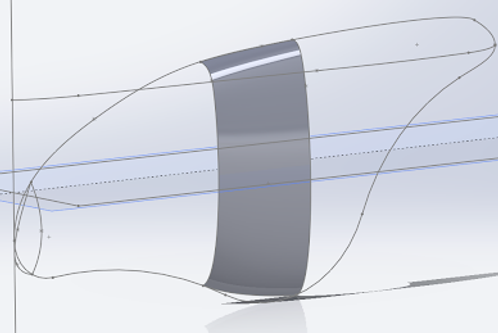
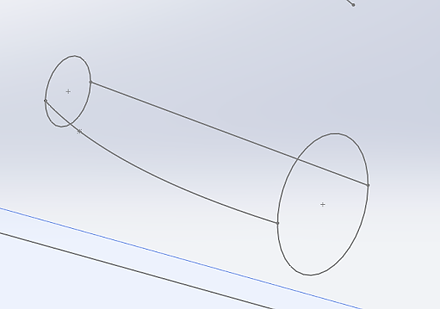
The main challenge at this point was getting the curve on the side of the body. Having the sketch of the general shape, I decided to section the body so I could control the curve positioning better.
After sectioning the shape, I used boundary surfaces, using profiles of each curve I needed. It was a long process but this really gave me control over the tangencies and shape of the model.
.png)
.png)
03
Body surface
For the rest of the body, it was a combination of boundary surface and surface lofts. The lofts were useful so the curves along the side would be more tangent, using the profiles from the boundaries, this helped getting a better transition between sections. After getting all the sections, I knitted them and later on the whole shape will be thickened.
03
Main body & seat
After this I extruded the main body to make it a solid, I did this by using the sketch previously made and extruding up to surface to the knitted surfaces made before. Then I mirror the body and the headlight. My idea for the body was to make the shape and then carve the cut outs we can see in the original design. After having the solid with both parts of the body, I shelled the solid and then did the middle cut out.
Then added the seat and the domes for the headlights. The domes were just solid revolves and the seat a normal extrude made out of splines, with a draft to give it an angle to it. I then focus on the handle, which I knew was somewhat challenging. The support tube was a sweep with guide curve and then the attachment that holds the actual handle was just a drafted extrusion
.png)
.png)
.png)
.png)
.png)
04
Bike handle
For the handle itself, I thought it could be a simple sweep, but using a 3D sketch so I could have a good transition without having to deal with more than one profile. After getting the sweep, I shelled it and added the grip, which was also made with a simple sweep and then carved out the curves for the grip, and then mirrored all these features to complete the handle.
05
Fasteners
After solving the main body, I started to focus on the fastening methods. There were already two on the outside and those were the most visible, because of the nature of the design, the fasteners would be on the inside mechanisms. That’s why for this modeling assignment I focused more on the pedal mechanism to show the fasteners. I researched how bikes are usually assembled and there are three part pedals, which consists of a screw-in gear, spindle with a bolt and the pedal itself.
.png)
.png)
.png)
06
Wheel cover
Then I focused on the front wheel cover which also meant a challenge because not only the shape was not really a defined or regular ellipse but also the side connectors that went all the way to the main body, were on an angle and were separate from the cover itself, so I needed to figure out how to connect both to the wheel cover and the body. I managed to solve this by using a 3D sketch going into the wheel cover and connecting it to a previously made arc coming from the top body, I made a surface out of the sketch to then thicken it.
07
Wheels
After this the model was basically done, I still needed the wheels, so I could do the renders, to solve this I used GrabCad to add wheels to my model. I ended up using the model “Bicycle spoked wheel” by Manmeet Tomar (2019). I adapted this model to implement it into mine, which gave a complete look to my model.
.png)
.png)


08
Final renders
Using Solidworks Visualize, I managed to bring to life the model, but it was a learning curve. Mostly working with textures and lights was the main challenge. When it came to decide how I wanted the model to look, I wanted to make it sophisticated, so minimalism played a great role here. The main colored element was the body with some white accents on the wheel, seat and grips, while everything else was chrome.
Also I had to work with lighted elements, which I've never rendered before but I was able to make it look like these were actually working. The whole rendering process was a challenge, from choosing a background that went with the bicycle colors, to make sure the shadows were correct and even creating a Bowden logo from scratch to make it more realistic.